Cover photo

Cover photo

Thursday, August 13, 2015

Summer Thursday (to mourn the loss of Summer Fridays)

Calvin has been working so hard lately, and I have NOT.  His summer Fridays are officially over, so I thought I would treat him to a nice surprise tonight to get him through the week. I am making lots of delicious appetizers to pick on and pouring him some well deserved wine, or beer, or both. 

Tomatillo and Green Pepper Salsa
8 tomatillos
3 green peppers
2 scallions
cilantro
juice of 1/2 a lemon
red pepper flakes
salt and pepper


Preheat the oven to 400 degrees. Husk and wash the tomatillos well (they can be really sticky). Dice up the green peppers. Drizzle with olive oil and generously salt and pepper the vegetables.  Roast in the oven for about 20 minutes.  Let the peppers and tomatillos cool a bit and throw all the ingredients into the food processor. (Normally I would use a jalapeño but I didn't have one, so I am using red pepper flakes for a little heat instead). 


Are you all so sick of photos of mason jars?

Zucchini Chips
1 large zucchini
oil
salt


I am starting to get sick of zucchini.  So I decided to try a new preparation and made some chips out of them.  It couldn't be easier, they just take a bit of time. Just keep in mind they seriously shrink, so what you start with will not be what you end up with!

Preheat the oven to 275 degrees.  Thinly slice the zucchini (this is when I wish I had a mandolin). Cover two baking sheets with parchment paper and lightly spray with coconut oil (you can also just brush on either coconut oil or olive oil).  Spread out the zucchini slices in a single layer.  Spray, or brush, with oil and lightly salt. Bake for 2 hours or so, or until they are golden brown and not at all soggy.


Sautéed Leeks, Tomatoes and Asparagus
2 leeks
1 bunch of asparagus
handful of grape tomatoes
olive oil
1 tablespoon balsamic vinegar

Cut and soak the leeks in water to remove all of the grit before cooking.


Heat olive oil in a large pan.  Add the leeks and cook for a few minutes.  Add the rest the asparagus and tomatoes and cook for a few minutes.  Add the balsamic vinegar and sauté for a few more minutes.


I made shrimp to go with the tomatillo salsa and corn on the cob too. Summer Thursdays may have to be a new tradition. Happy eating.


Friday, August 7, 2015

Engagement Party Time!

It is time to celebrate two of my favorite people, Greg and Danny, who recently got engaged.  We are going to my mother-in-law's for their engagement party this weekend, so my job today is to make a gift basket for the boys getting hitched.


I bought a cute basket to hold all my homemade goodies. I also used a mason jar stamp to make labels for everything. That way, Greg and Danny know what they are getting, and also know when to use it by.


Cute right?

Cucumber Infused Gin
Thinly slice the cucumber and place in a jar.  Fill with gin (I used Bombay, because it is Greg's favorite). Let the gin sit for 2 to 3 days.  Great for gin and tonics or cucumber gimlets.


Fennel Infused Vodka
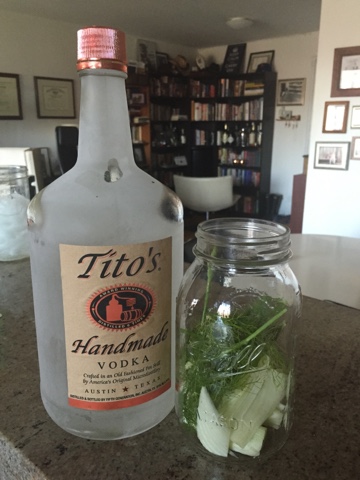
Combine 1 small fennel bulb, fronds and vodka. This infusion can sit for much longer and will be good for up to a month (remove the fennel if it starts to break down).  


Tito's is my favorite vodka and is very affordable.


Fire Roasted Peppers

peppers (any variety)
1 cup of olive oil
2 cloves of garlic


Not having a grill makes this a rather hilarious process.  Soak skewers (or wooden chopsticks will do) in water for about ten minutes.  While they soak, rinse peppers, and cut off the tops. 


Place your gas stove on medium heat.  Skewer the peppers and place right on the stove top.  Turn as needed.  You want a charred skin on all sides.  


This just looks ridiculous.


Once the pepper is done, place in a sealed ziploc bag to steam (this will help to remove the skin later).  Repeat this process with all the peppers.  


Once all of the peppers are done, take them out the bag and use your hands to remove as much skin as possible (some char left over is fine). Then slice the peppers open and remove the seeds and any white membrane.

Heat about a cup of olive oil in a pan on medium low heat.  While it warms, slice two cloves of garlic and put them in a jar. Then place the peppers in the jar.  Pour the olive oil over the peppers.  Let cool before placing the lid on.


These peppers will keep in the fridge for up to three months.  

Lemon Sugar Scrub
2 cups of white sugar
1/4 cup of coconut oil
lemon essential oil


Place the sugar in a bowl.  Slowly add the oil while stirring until you have a soft consistency that is not too oily.  Add lemon essential oil and stir.  Put into a jar and seal.


Some for the boys and a little leftover for me.


I also included my Lavender Bath Salts, Baba Ganoush and Fruit Leather.  You can find the recipes here. 
http://farmtoharlem.blogspot.com/2015/06/the-gift-of-relaxation.html 
http://farmtoharlem.blogspot.com/2015/08/fruit-leather.html
http://farmtoharlem.blogspot.com/2015/08/baby-ganoush-baba-ganoush-made-with.html

Wednesday, August 5, 2015

Fruit Leather


I had my first recipe request from my friend Dierdre.  Last year I made a lot of fruit leather, yet somehow I kind of forgot about it until Dierdre mentioned it.  Our last delivery from the CSA was filled with plums (too many plums for Calvin and I to eat) and so plum fruit leather is about to happen.  I think I am also going to throw in some blueberries before they go bad.  I have also made fruit leather with apples and cinnamon, pears and cilantro, strawberry and mint and some others that I can't remember at the moment. But today, its all about plums.  


Plum and Blueberry Fruit Leather
plums (I had enough to fill a baking sheet)
blueberries
2 tablespoons of lemon juice
1/4 cup of sugar (I have also used agave or honey in the past or nothing at all if the fruit is extra sweet)

Preheat the oven to 400 degrees.  Slice the plums in half, remove their pits and place on a baking sheet.  Bake for about 15 minutes.


Put the plums, blueberries and lemon juice into a food processor (you can use a blender if you don't have one) until a smooth puree forms.  Add sugar and puree again.  


Line a baking sheet with parchment paper and pour the mixture on in an even layer. 


Make sure you use an oversized piece of parchment paper so that your fruit leather doesn't stick to the side of your baking sheet.

Let the fruit dry out in the oven for as long as it takes to form fruit leather.  If your oven has a low setting, you can put it on 140 degrees.  My oven's lowest setting is 170, so I periodically turn the oven on and off while the fruit leather dries out.  This process can take a long time, so feel free to just leave it in a cool oven and let it hang out all day and over night if it needs to dry out more.  The batch I made today was pretty thick, so I let it dry out for 2 days.


Once the fruit leather is done (it should feel tacky but not sticky) you can start to cut it.  I roll it up in the parchment paper and cut it into 1 inch strips using a scissor or a pizza cutter.  Store in a ziploc bag!


Monday, August 3, 2015

Baby Ganoush: Baba Ganoush made with baby eggplant. So cheesy right?

I have always loved eggplant, so when Calvin brought home a million little purple beauties from our CSA I was thrilled. So today I am making baba ganoush, a creamy, decadent, eggplant dip that is a major crowd pleaser and yet really simple and easy.


Baba Ganoush
20 baby eggplants or 2 large eggplants
1/4 cup of tahini (use more or less on your taste preference)
juice of half a lemon
olive oil
4 cloves of roasted garlic (I prefer to use roasted garlic over raw garlic.  If you use raw garlic, use 1 clove instead)
1 teaspoon of cumin
salt and pepper to taste


Before

After.  They aren't so cute anymore.

Prick the eggplant with a fork and roast in a 375 degree oven until nice and soft (you can use the same technique when using a large eggplant).  Let the eggplant cool, and cut open to scrape the meat of the eggplant away from the skin.  Put the eggplant in the food processor.  Add tahini, lemon juice, garlic, cumin, parsley, salt and pepper.  While the food processor is running, drizzle in olive oil until you get a creamy consistency.


Peeling these babies was a labor of love (and plenty of skin ended up in the food processor).  I suggest using a larger eggplant to make life easier.  Just cut them in half and scrape with a fork.


Serve with sliced cucumber, radishes, pita, chips or anything else you have on hand. 


I was saving this for Calvin, but it may not last that long.

Tuesday, July 28, 2015

No Noodle Lasagna

Lately, all I want to eat is cheese.  Great idea, right?  Not really.  So I needed a way to satisfy that craving without the guilt.  Last week from our farm-share, we got enough zucchinis to feed a small army, so I decided to make a zucchini lasagna.  I have had enough cheese lately, so I am going to make a cashew cheese to satisfy this craving.  To be honest, this is the first time I am making this dish with zucchini.  Normally, I use eggplant (which is DELICIOUS, and ends up being a cross between lasagna and eggplant parm, without the parm).  If you decide to use eggplant, just bake the slices of eggplant first for about 10 minutes.  Fingers crossed this all turns out alright...


Cashew Cheese
1 and 1/2 cups raw cashews
1 tablespoon of nutritional yeast
2 tablespoons of lemon juice
Salt and Pepper to taste
Water

First, soak the raw cashews in water for approximately 3 hours. Drain the water and put into a food processor with lemon juice, nutritional yeast, salt and pepper.  Start to run the food processor and drizzle in water through the feed tube.  Do this slowly, stopping to check if the consistency is to your liking (think ricotta, not cashew soup).  I use this all the time in recipes instead of cheese.  You'd be amazed how good it is!


I like to stock up on raw cashews at Trader Joe's and store them in the freezer.


No Noodle Lasagna
4 small zucchinis or 3 large
Cashew cheese
Tomato sauce (I made my own, but feel free to use a jar to make life even easier.  For the recipe, check out my Pizza Party post).
1 egg

Pre heat the oven to 325.  Slice the zucchini thinly (I did not cut them as thinly as I should have), sprinkle with salt and set aside on paper towels to drain.


To assemble the lasagna, start by putting a little sauce on the bottom of a baking dish. (Please ignore the dish I am using. Normally I would be using a square baking dish, but we cooked for friends and lost our dish forever.  Ever heard of a round lasagna? Me neither.  This is gonna be weird.) 

Next, put a layer of zucchini slices.  Then add a layer of cashew cheese.  Repeat this pattern, sauce, zucchini, cheese, until you reach the top (make sauce your final layer).  Cover with foil and bake for about 45 minutes.  Remove the foil and, this may sound strange, but pour a lightly beaten egg over the top and bake for about ten minutes more.  This egg is going to give the illusion of a cheesy layer and will taste delicious, and somehow not eggy at all.  If this seems too odd for you, then skip it. But if you do skip this step, then I will judge you for being small minded and ridiculous.  Okay that's not true, but just try it.


Let the lasagna sit for a few minutes before cutting into it and serve with a simple salad.  

Tuesday, July 21, 2015

Quick Pickle


It is hard to explain how much I LOVE pickles.  I also love quick, simple recipes and here is one of them.  There are certainly a ton of more complex ways to pickle vegetables, but this is too fast and easy to pass up.  These pickles won't keep forever, but they will last for about 2 weeks in the fridge.  You can use this technique with any and every vegetable you have and really any variety of spices you may like.  It is a great use of all of our CSA vegetables.  I also love to use them as a homemade accoutrement to a Bloody Mary bar.  Yum. 


Pickled White String Beans
white string beans
white vinegar
water
1 teaspoon kosher salt
1 tablespoon black peppercorns
1 tablespoon mustard seed
1 teaspoon red pepper flakes

First blanch the string beans in bowling water for about three minutes.  Shock them in ice water to stop the cooking.  Once cool, place the string beans in a mason jar.  


I may have forgotten this step, which is why there are peppercorns and red pepper flakes floating around.  Oops.  


Add the spices and salt.  Then fill the jar halfway with vinegar and fill the rest with water.  Shake it up and put in the fridge.  They will be at their peak pickle in three to five days.  

Pickled Radish
radishes
vinegar
water
1 teaspoon kosher salt
1 tablespoon black peppercorns
1 tablespoon mustard seed


Cut the radishes in half and add them to a mason jar. Add the spices and salt.  Then fill the jar halfway with vinegar and fill the rest with water.  Shake it up and put in the fridge.  They will be at their peak pickle in three to five days.  


Sunday, July 19, 2015

Fish Cake Friday (except it's Sunday, but Friday sounds better)

It's Sunday and my mom is coming to NYC for a visit.  I thought I would make us some lunch before we go out on the town.  I decided to make a favorite in our house, fish cakes.  For today's recipe I am using tilapia.  Tilapia is incredibly mild, so this preparation adds lots of flavor to the fish.  They are simple and can be prepared ahead of time, which is always great when you have guests.  I am serving this with some (leftover) cabbage slaw.


Fish Cakes
4 Tilapia filets
1 egg
1/4 cup of mayonnaise
1 heaping tablespoon of mustard (I use whole grain mustard, but any dijon or spicy mustard would work too)
Juice of 1/2 a lemon
1/3 cup bread crumbs*
Salt
Pepper
(If I had parsley, I would chop some up and throw it in here too, but I don't, so I won't)

*I make my own "lazy" bread crumbs.  All I do is toast Udi's gluten-free bread, and let the food processor do the work. 


Preheat the oven to 375 degrees.  Place the tilapia on a baking sheet lined with parchment paper.  Bake (with nothing on it) for about 10 minutes, or until the tilapia flakes easily with a fork. Once the tilapia is done, remove it from the oven and set aside to cool.  

In a large bowl combine the egg (lightly whisked), mayonnaise, mustard, lemon juice, salt and pepper.  Once the fish is slightly cooled throw it in the bowl and use a fork to flake the tilapia. Mix all of the ingredients together and add the bread crumbs.  If the mixture seems too wet, add a bit more bread crumbs.  If the mixture seems too dry, then add some more mayonnaise.  


Now comes the fun part.  Get your hands dirty and start to form the fish cakes.  If you are unsure of the size, use a 1/4 cup measuring cup to keep your cakes uniform.  Once you have formed the cakes into the shape you like, place them on a plate.  Cover the plate with plastic wrap and place in the fridge for at least 30 minutes, but up to several hours (this will help your cakes stay together when you cook them).


When you are ready to cook, preheat a large pan with enough coconut oil to coat the bottom.  Once the oil is hot (medium/high heat), place the cakes into the oil (I do this about 4 at a time, so you have to do it in batches).  Let the cakes cook for about 3 minutes on each side or until they are golden brown.  Cook them on the other side to achieve the same color.  Remove and drain on a paper towel (if your oil is nice and hot these fish cakes will not be oily at all, if they are too oily then you need to turn up the heat).  


When ready to serve, drizzle some lemon juice over the fish cakes and give them an extra pinch of salt.